Editing Configuration in JMRI
Step-by-Step: Edit Node Name in LccPro
One of the most common configuration tasks is renaming a node to something meaningful (e.g., “Test Blink Node” instead of “async_blink”). Here’s how it works:
1. Launch JMRI and Open the LccPro Tool
Start JMRI (5.12 or later) and navigate to:
Tools → LCC → LccPro
You should see a list of nodes currently on your LCC network. Your ESP32 node appears here, identified by its SNIP information (manufacturer, model, and user name).
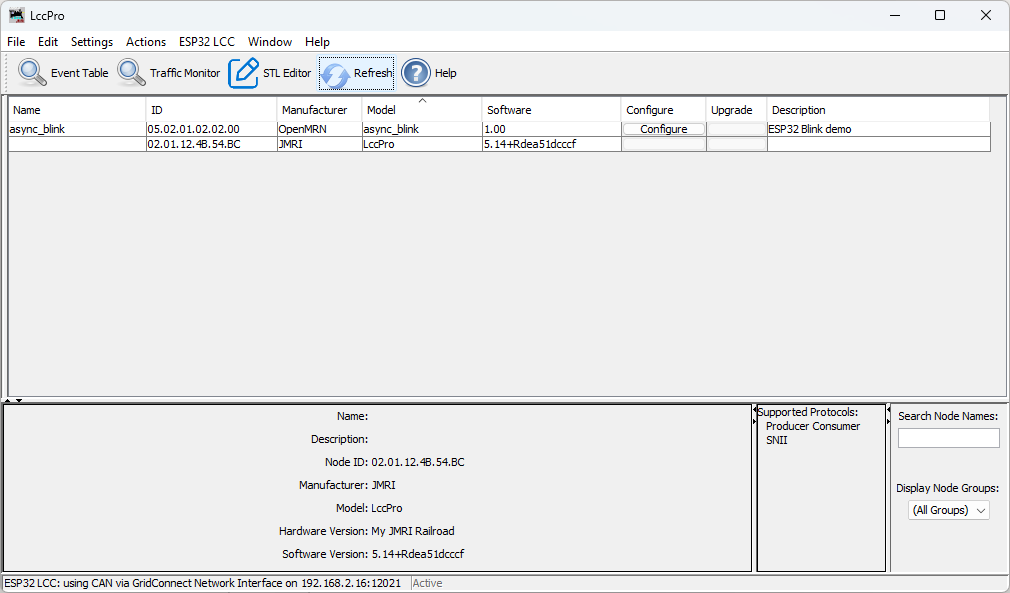
2. Select Your Node
In the node list, click on the node you want to configure (e.g., “async_blink”).
The details panel below the list now shows information for the selected node:
- Node ID
- Static SNIP Data: Manufacturer (
OpenMRN), Model (async_blink), Hardware version (ESP32), Software version (1.00) - SNIP User Data: User name (currently
async_blink), user description (ESP32 Blink demo)

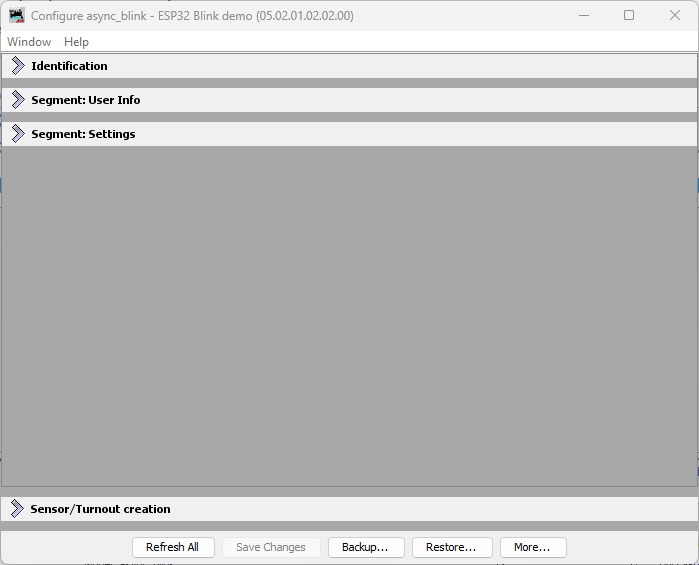
3. Open the Configuration Editor
Click the Configure button (or double-click the node).
LccPro opens a dialog showing the node’s CDI. You’ll see tabs for different sections:
- Identification (read-only): Static SNIP data from firmware
- User Info (editable): SNIP user name and description from config file
- Settings (if present): Application-specific configuration
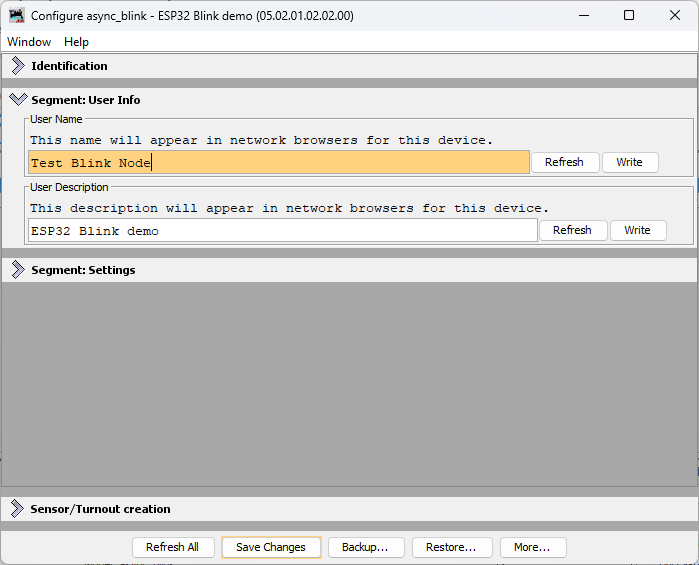
4. Edit the User Name
Expand the User Info tab.
You’ll see the User Info tab with fields populated with the current values from the node (as shown in the previous step). Change the User Name to something meaningful, like Test Blink Node. You can also edit the description if you’d like.
5. Write the Changes to the Node
After editing the User Name, you have two options:
- Write individually: Click the Write button next to the User Name field to send just that change to the node
- Write all changes: Click the Save Changes button at the bottom of the dialog to write all modified fields at once
Either way, LccPro sends the new user name to the ESP32 node via OpenLCB Configuration protocol:
sequenceDiagram
    actor User as You (JMRI)
    participant JMRI
    participant ESP32 as ESP32<br/>(OpenMRN)
    participant SPIFFS

    User->>JMRI: Click "Write"<br/>or "Save Changes"
    JMRI->>ESP32: Configuration write message<br/>(new user name)
    ESP32->>SPIFFS: Write new name<br/>to offset 0-127
    ESP32->>JMRI: Configuration write ACK<br/>(success)
    JMRI->>User: Changes saved!
Here’s what the actual LCC traffic looks like when you save the user name. This trace captured from an LCC monitor shows the Datagram messages exchanged:

For SNIP user data (Name and Description), the changes take effect immediately. There is no separate “apply” step needed.
6. Verify Persistence
Once saved, the new name persists across reboots:
-
Immediate Check in LccPro: Click the Refresh button above the node list. This tells LccPro to ask all nodes for their current information. The node list should now show the updated name
Test Blink Nodeinstead ofasync_blink. -
Power Cycle Check: Power off the ESP32, wait a few seconds, power it back on. Reconnect JMRI to the node (or click Refresh again). The name is still
Test Blink Node—it was saved to SPIFFS.
What Just Happened
When you edited and saved the name, OpenMRN did this:
- Received the new value via JMRI’s Configuration write protocol
- Wrote it to the config file at offset 0-127 (the SNIP user data area)
- Confirmed the write was successful back to JMRI
The next time the node boots, it reads this config file from SPIFFS and exposes the updated user name via SNIP protocol. The firmware itself didn’t change—only the data in flash storage.
SNIP user data (name and description) is part of the OpenLCB standard for node identification. Changes to these fields take effect immediately without needing an explicit “apply” step.
What This Enables
This workflow shows the power of configuration:
- No recompilation needed to change the node name
- Persistent across power cycles
- Standard protocol (OpenLCB Configuration) that any LCC tool understands
- Centralized in JMRI—all nodes configured from one place
Later sections of this chapter extend this pattern to make event IDs, blink interval, and other settings configurable too. The same workflow will apply.
Troubleshooting: Name Doesn’t Save
If you edit the name in JMRI but it doesn’t save:
- Check Connection: Ensure JMRI is still connected to the node (green indicator in LccPro)
- Check Permissions: The node’s CDI must declare the User Info segment as writable. In our example, it is.
- Check SPIFFS: The ESP32’s SPIFFS must have free space. If SPIFFS is full, writes fail silently. Check serial output for error messages.
See Chapter 3’s code-walkthrough section for details on how configuration is initialized.
Next: Application-Specific Configuration
This section covered editing SNIP user data (Name and Description), which are standardized fields handled automatically by OpenMRN. When you add application-specific configuration fields (like the blink interval in the next chapter), the workflow changes slightly—you’ll need to use the Update Complete button to tell the node to apply your custom configuration changes. See Chapter 4’s “Adding a Configurable Interval Setting” section for that workflow.